| |
| |
|
|
 |
| |
|
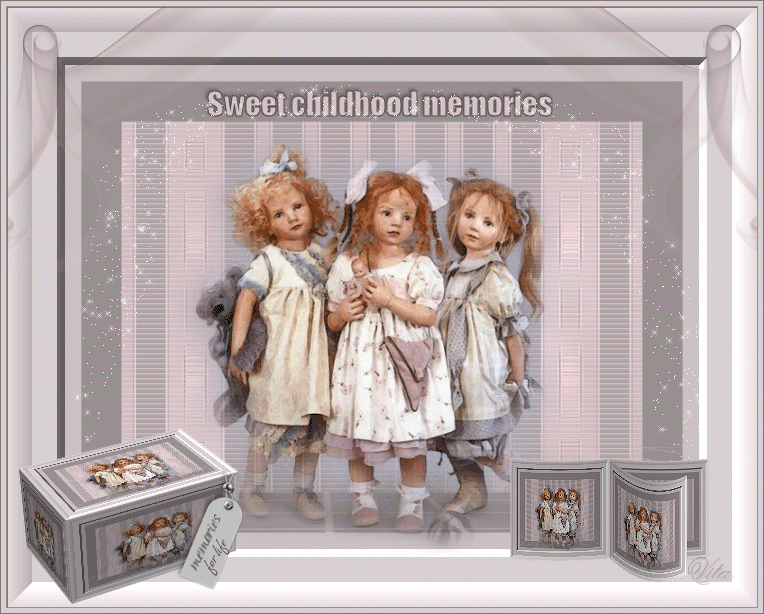
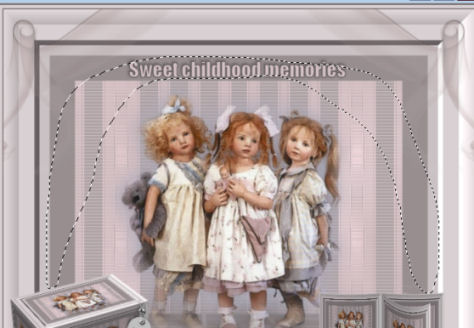
Childhood memories! |
|
|
|
|
 |
|
Filter
Vizros you can download
HERE |
|
|
|
 |
|
The ruler, can you take
down and use as a
pointer. |
|
|
|
Selection vitas_20_ch
shall in your
selection folder
located in my
psp file! |
|
The masks sq-stripe-ribbon
and sq-perspective
- flooring-3
shall in your
mask folder |
|
|
 |
|
|
|
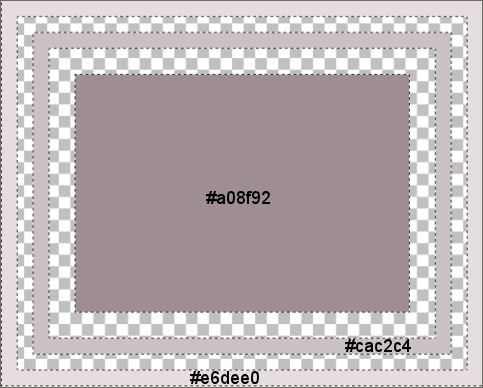
1.Open a new
raster layer 750 x
600 , and go
to Selection /
load save selection from disk
and find vitas_20_ch |
|
colors
as shown below |
 |
|
Color codes are
from edge to center
#e6dee0 - #cac2c4 - #a08f92 |
|
|
|
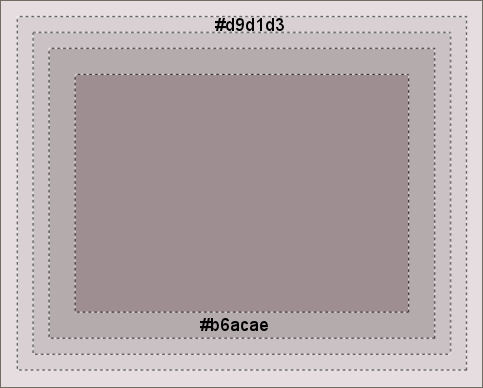
selection is still
on! go
to Selections /
Invert ....
colors as shown
below! |
 |
|
Color codes are #d9d1d3
- #b6acae |
|
|
|
|
|
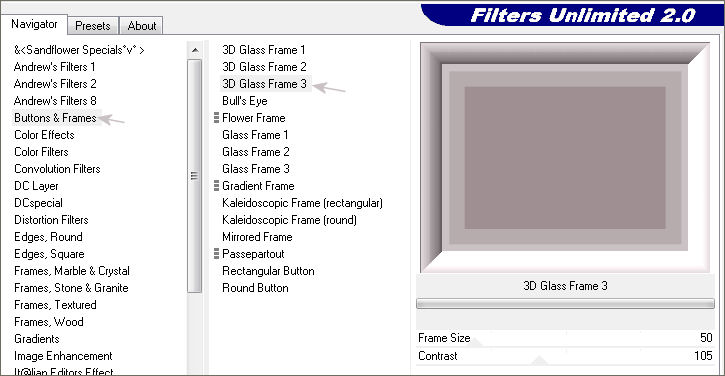
2. Selection / Invert ,go
to Effect /
Filter Unlimited
with settings as shown
below! |
 |
|
|
|
Selection / select none |
|
|
|
|
|
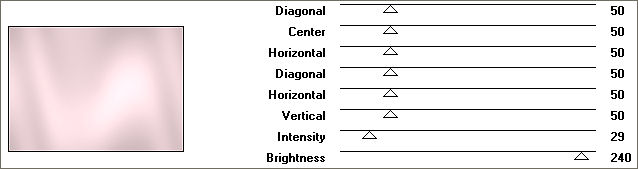
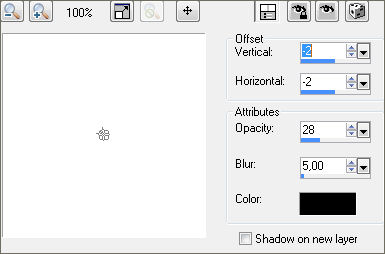
3.Click with
magic wan
in the middle of the
picture and go into
graphic PLUS
/ gross
shadow with settings as
shown below. |
 |
|
|
|
|
|
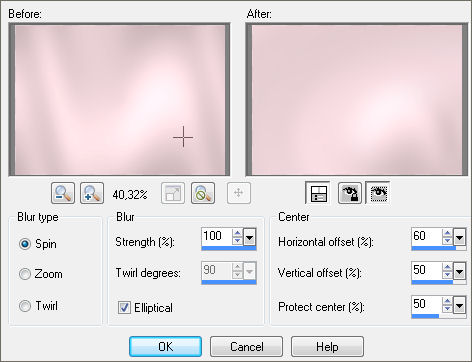
Go
to Adjust
/ Blur
/ Radial
blur with settings as
shown below |
 |
|
|
|
|
|
4.selection
still on, open a new
layer above ....
Use color # b6acae
on it! |
|
|
|
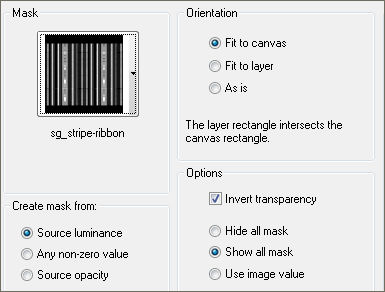
Go
to Layers
/ Load / Save
Mask / Load
Mask From Disk
and locate sq-stripe-ribbon
set of options as shown
below. |
 |
|
|
|
|
|
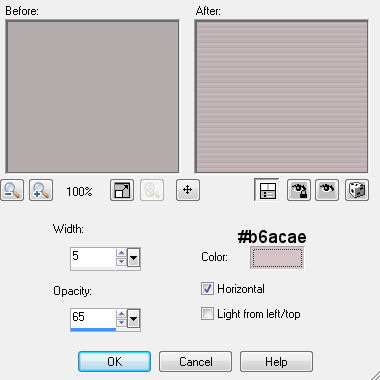
Stand on
the layer below
masklayeret and go to
Texture /
blinds with settings as
shown below. |
 |
|
Color codes are
#d7c4c8 |
|
|
|
select
mask layer
in layer palette
and select merge
/ merge group! |
|
|
|
Selection / Select none!
go to
Effects / FM
Tile Tools /
Blend Emboss
with default settings. |
|
|
|
Merge / merge visible |
|
|
|
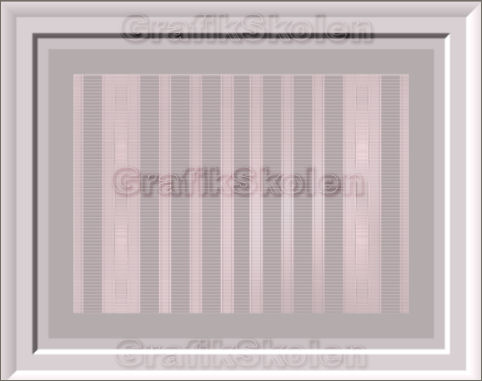
You should now have a
result as shown below. |
 |
|
|
|
5. Click with
your magic wand on the
edge and with
magic wan settings
as shown below! |
 |
|
|
|
Open a
new layer above it
and use color #
998f91 ...
Selection / select
none |
|
|
|
Go
to Layers
/ Load / Save
Mask / Load
Mask From Disk
and locate sq-perspective
- flooring-3
sets of settings as in
Section 4 |
|
|
|
Stand on the mask
layer in layer
palette .......
right click and choose Merge
/ Merge
group! |
|
|
|
Merge / merge visible |
|
|
|
|
|
6. Open
the tube baby12.pspimage
and set it as
my picture!
Merge /
merge visible |
|
|
|
|
|
7.Go
to edit /
copy, and again in the
edit and paste as
new layer! |
|
|
|
|
|
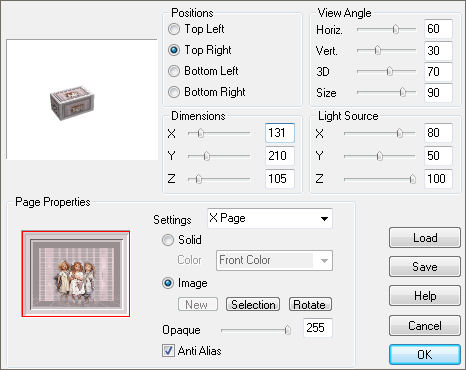
Go
to effects
/ Vizros
/ box with settings as
shown below |
 |
|
|
|
|
|
Click with
your magic wand on the
white and then click
Delete on the keyboard. |
|
|
|
|
|
7.
Put the box
as my image
and use the Selection
Point to Point and
smugde to remove
and correct the ugly
edges! |
|
|
|
|
|
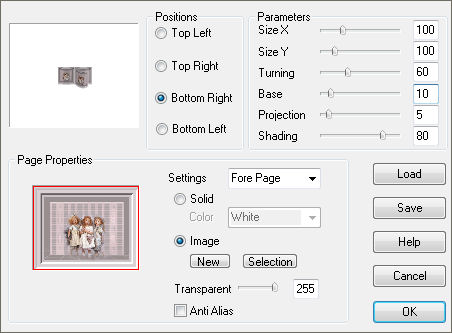
8.
Click Undo
2 x on
your copy
and go to Effects
/ Vizros
/ book
with settings as shown
below. |
 |
|
|
|
|
|
Put
the book as my image
and go to Adjust
/ sharpness
/ sharpen.
Remove
ugly
edges
with point to point
and smugde! |
|
|
|
Merge / merge visible |
|
|
|
9.Write
Sweet childhood
memories set
# 4e4849
the foreground
color and #
d5c3c6 the
background color using
Impact font
size 22 |
|
|
|
Set
text as on my picture
and give the drop shadow
as shown below. |
 |
|
|
|
Merge / merge visible |
|
|
|
10. set
tags on the box
as my image, give
drop shadow as before |
|
|
|
Merge / merge visible |
|
|
|
|
|
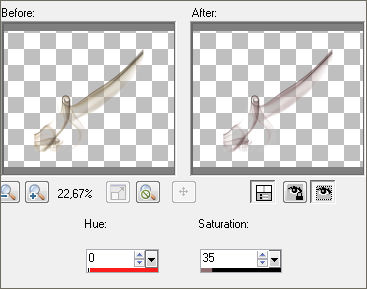
11. Open
tube
MarieL_2006_10Octobre_smoke01t, go to
Adjust /
Hue and Saturation
/ colirize
with settings as below. |
 |
|
|
|
Copy the tube
into the working
layer and set the
top left as on
my picture, dublicate
and go to Image
/ Mirror |
|
|
|
Close the bottom
layer and merge /
merge visible the 2
tubes, set opacity
to about
36th |
|
|
|
Merge / merge visible. |
|
|
|
12. Image / add borders 1 pixel
#998f91 ... Image / add borders 5 pixel #d9d1d3 ...Image / add
borders 1 pixel #998f91 |
|
|
|
|
|
13. Drawing with
Freehand selection tool
as I have done below |
 |
|
|
|
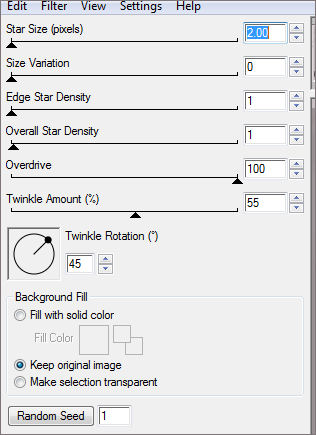
Go into
Effect /
Alien Skin
/ constellation
with settings as
shown below. |
 |
|
|
|
Selection / select none! |
|
|
|
Edit / copy |
|
|
|
Open animation
shop and go to
edit / Paste
/ Paste as
New Animation |
|
|
|
Back to psp
and click undo
2 times, go to
Constellation and click
once on a
random seed |
|
|
|
Edit / copy |
|
|
|
Open animation
shop and go to
edit /paste / paste after current frame |
|
|
|
Back to psp
and click undo
2 times, go to
Constellation and click
once on a
random seed |
|
|
|
Edit / copy |
|
|
|
Open animation
shop and go to
edit /paste / paste after current frame |
|
|
|
|
|
14. Now you have
3 frames the
in Animation shop
... go to
edit / select
all, go to
Animation / Frame
propetices and set
the number at 12 |
|
|
|
Save as gif |
|
|
|
|
|
|
|
finished |
|
|
|
created
21
November 2012 |
|
|
|
© Copyright VitasClipart.dk |